Thursday, February 21, 2013

President's Day Palooza!

45 minutes

Intended for 24 guests, grades K-2

Supplies

2 tubs of pretzel rods (about 170)
3 containers of vanilla frosting
1 glue stick
1 spoon
24 zip lock sandwich bags
24 paper plates
24 pieces of green construction paper
"Duck for President" by Doreen Cronin
"John, Paul, George and Ben" by Lane Smith

Program

Let's have some fun with this one!  But before the fun can be successful, we need to set it up right.  The craft for this program is building pretzel rod cabins.  Lincoln lived in a log cabin, but I can assure you it wasn't this tasty! 

To create a building base for your cabins, trace the paper plate on the green construction paper.  Cut out your circle, and glue the green paper onto the paper plate.  This helps to reinforce it a bit, and it also acts as "grass" to build upon. 

This next step is a little messy.  You need to spoon out about 1/4 of the frosting can into a zip lock sandwich bag.  With this, you're creating little pastry bag so the kids will be able to pipe out the icing later.  This takes a little time on your end, but it saves a lot of mess later. 


As for the program itself, start off with a story time reading both books.  They're silly but also informative!  And then just let the kids build their edible pretzel rod cabins.  The concept is the same as Lincoln Logs and using the frosting as a glue to hold the pieces together.  It's fun and delicious. 


I was pretty impressed by the architecture skills of these 4-7 year olds! 

Monday, February 11, 2013

Earth Day Birthday!

45 minutes

Intended for 24 guests, grades K-2

Supplies

2 flats (48 flowers each) of marigolds
24 trowels (Milk jug shovels)
"The Curious Garden" by Peter Brown
Popcorn
Juice Boxes

Program

Earth Day is April 22nd!  What better way to celebrate than by having a birthday party for the Earth!  And who doesn't like the gift of flowers?

Before we can even begin, this program takes a bit of preparation and planning.  Unless your library has a massive budget, or a lot of gardening staff that knows how to share well, you're going to need to figure out  way to produce 24 trowels.  Fortunately, thanks to Pinterest, you can learn how to turn any old piece of trash into something moderately functional.

I had stumbled upon this project on Pinterest which came from the blog Darling, Just Be...


In this project, you turn an old milk jug into a trowel!  This is perfect.  The kids won't be digging deep holes, and then they can even take them home to use at the beach or what have you!  So for this project to even take place, you need to collect about 24 milk jugs.  And then properly fashion them into trowels perfect for little hands.  

Marigolds are in season in April, they help to keep away mosquitoes and ants and they are pretty!  Which is what makes marigolds a perfect choice for this planting project.  Each child will be able to plant 2 flowers along the border of the library garden. The planting outside should take about 25 minutes.

After planting outside, the kids can come in for a reading of Peter Brown's "The Curious Garden" and have some popcorn and juice!


Thursday, February 7, 2013

You're Never Too Old: Finger Painting

45 minutes

Intended for 20 guests, grades 3-5

Supplies

Tempera paint
Heavy stock paper
"Stuck" by Oliver Jeffers
"A Funeral in the Bathroom: And Other School Bathroom Poems" by Kalli Dakos

Program

Who says that once you turn a certain age that you can't have the same fun as the little ones?  I know I didn't.  Which is certainly one of the reasons why I love being a children's librarian! 

This is a program series titled "You're Never Too Old."  It is geared for grades 3-5, and they get to have fun that they might think they are "too old" to have anymore.  This first program is Finger Painting.  It is exactly what it sounds like.  Kids, grades 3-5 get to finger paint again.  Something they may not have done since kindergarten, or, for shame, have never gotten to do ever! 

I selected some picture books, something they may also think they are "too old" for, that would be right up their alley.  It's amazing how many picture books are written on a higher level and can still be enjoyed.  Perhaps another reason why I am a children's librarian!

For this, I read two poems from "A Funeral in the Bathroom," Broken Toilet and Emergency.  You Can probably guess what they're about by the title.  And I also read "Stuck" by Oliver Jeffers.  They loved the silliness of it and were able to pick up on the irony (I was even able to give them a little lesson about irony!). 

After that, they were so excited to just finger paint!  Which eventually turned into the children painting their fingers, and their hands, and their arms... But hey, that's what it's about! 

 
I set out the tempera paint on plastic coated paper plates.  I only gave them the 3 primary colors plus white.  I told them to mix and get creative! 

 
They had such a good time.  I joined in too.  There should be finger painting for adults! 


Saturday, January 19, 2013

Monster Bookmarks!

45 minutes

Intended for 20 guests, grades 3-5

Supplies

Card-stock
Decorative paper
20 pairs of scissors
20 glue sticks
20 bookmark templates

Program

This program is a crafty program!  The children will be making bookmarks they can put on the corner of a page.

The basic shape of the bookmark will be given to them, cut out from card-stock.


The children then have to fold the "flaps" inward, to make a diamond shape which creates a pocket to hang on the corner of the page.  


And then they can use the decorative paper to make whatever they want.  Below there is a monster, a bear, a kitty and just a funky fresh bookmark.  Kids can decorate however they feel!


Monday, November 19, 2012

Monster Mash

45 minutes

Intended for 25 guests, grades K-2

Supplies

25 White pillow cases
Markers
12 Toilet paper rolls (mummy roll ups)
Monster poster (pin the eye on the monster)
25 eyes
"Zombie in Love" by Kelly DiPucchio
Halloween Music
Music player

Program

For this program I had a couple of activities planned -- a "mash" of activities, if you will.

As the children came in, I had the Halloween music playing to set the mood.  I told the children that the first thing we were going to be doing was making trick-or-treat bags to use!  I gave each child a pillow case, because they are big enough to fit a whole lot of candy, and markers and free range to decorate as they saw fit.  I gave them about 15-20 minutes to color and be free!


After that, Mummy Wrapping!  I broke them up into teams of two.  I had an uneven number, so I had one child be a judge with me for the contest that was about to take place.  One child was given a roll of toilet paper, and told to wrap the other one up as best they could.  They needed a little help with this, and so I ran around and helped each pair out a bit.  I gave them 4 minutes to do the best wrap job their little hands could manage.  At the end, my little judge and I picked out a winner.  There was no prize though, because everyone is a winner at the library.

After all that running and spinning, we had a quiet little story time with "Zombie in Love" by Kelly DiPucchio.  This story is adorably hilarious, and the children agreed!


After that, we had a little time left, and we ended with some "Pin the Eye on the Monster!"  I printed out simple color copies of one-eyed-monsters and then printed out a bunch of their eyes.  I cut out the eyes and put double sided tape on the backs.  The children were blindfolded, and spun around and sent them in the direction of the poster.  This was a good time for everyone.


With that, the program was concluded and a good time was had by all!


Wednesday, September 19, 2012

Talk Like A Pirate Day - September 19th (for the young buccaneers)

30 minutes

Intended for 20 guests, ages 3-5 with an adult

Supplies

"A is for Arrr!: A Pirate Alphabet" by Laura Purdie Salas
"Pirate Nap: A Book of Colors" by Danna Smith
20 pieces of white card stock
20 red foam squares (flag)
20 brown paper squares (treasure chest)
20 black ship shaped pieces
20 popsicle sticks
20 blue crayons
20 paper book cutouts
Bingo markers (Do-a-dot Art: Sponge Tip Applicator)
Jewel stickers

Program

With programs for the littler ones, I always have to remember to break up the story time with some finger plays.  Kings County Library System has a great wiki where they have an awesome collection of finger plays, rhymes and songs for the little ones.  Also, I tend to structure my programs a bit more for the little ones.  Not as much free time, more bing-bang-boom one thing to another to keep them entertained.  That being said, the program goes as follows:

Hello Song (Pirate style)

Hello, Hello!
Hello and how arrrrrrrrrrrrrr you?
I'm pirate-y, I'm pirate-y!
And I hope that you arrrrrrrrrr too!
(x2)

If you're a pirate

Tune: If you happy and you know it!

If you’re a pirate and you know it, swab the deck (Swish, swish)
If you’re a pirate and you know it, then you’ll hear the sea winds blowin’.
If you’re a pirate and you know it, swab the deck (Swish, swish)
(Repeat the song with “Walk the plank” (Stomp, stomp) & Say ahoy: Ahoy! (Wave hello)

Well blow me down mateys!  You all sound like formidable pirates to me!  This first book I have you ye all is "Pirate Nap: A Book of Colors" by Danna Smith.  Do you all think that you landlubbers can help me with the colors in this book?  Say "arrrrrr" if you think you can!  

"Pirate Nap: A Book of Colors" by Danna Smith

That was g-arrrrrrrr-eat ye landlubbers! Perhaps yer more pirate-y than I thought!  Let's do a little ditty together about Five Pirates on a ship!   

Five Pirates

Five pirates heading out to shore
One jumped overboard and now there are four.
Four pirates heading out to sea
One stole all the Captains's gold
And now there are three.
Three pirates with not a lot to do
One was made to walk the plank
And now there are two.
Two pirates having lots of fun
One drank all the first mate's juice
And now there is one.
One pirate sitting in the sun
He decides to abandon ship
And now there are none.

Well done me mateys!  Seems to me ye all know yer counting, but do ye know yer alphabet?  Let's practice it together to prep-arrrrrr-e for the next book!  (Sing the alphabet together.)  Well done! Does any one know what letter is a pirate's favorite? RRRRR!

"A is for Arrr!: A Pirate Alphabet" by Laura Purdie Salas

Well done again!  Let's sing one more pirate-y song before we do our craft for the day! 

I'm a Little Pirate

Tune: I'm a Little Teapot

I’m a little pirate, short and fat.
Here is my eye-patch, here is my hat.
When I pull the plug, the boat it sank,
That’s why they made me walk the plank!
(x2)

Arrrrrrr!  Let's go and make our craft! 


Once they have completed their craft, the program is concluded and the little pirates can go out and explore the open sea!  


Wishing Stones

45 minutes

Intended for 25 guests, grades K-3

Supplies

"Ella May and the Wishing Stone" by Cary Fagan
25 smooth stones (North Shore beaches are the best place to gather stones)
Paints
Glue
Glitter
Stickers

Program

This past summer, the theme of the 2012 Summer Reading Club was "Dream Big: READ!" and so in line with dreaming, I created a program that encouraged wishing.

The idea for this program is taken from the book "Ella May and the Wishing Stone."  It is about a little girl, Ella May, who stumbles upon a wishing stone that just so happens to make her wishes come true.  She brags to her friends about her wishing stone's powers and becomes just a tad bit rude with her new found power.  No spoilers about how it ends though, you'll have to check it out for yourself! 

For the program, I read this book.  And then I let all the children make their very own wishing stones!  (Disclaimer:  These wishing stones hold no "real" power and should not be treated as such.)  It's fun to wish and hope and dream, and if there is something that can encourage that in the children, then by golly, I'm for it!

They were given smooth stones, and paints, and glue, and stickers and a whole bunch of glitter!  I mean a lot of glitter.  Because what's a wishing stone without mass mounts of glitter on it?  The glitter makes it extra special!  And they were encouraged to just create and decorate!

Here is a wishing stone that I made:


And although I have had no wishes come true (yet!), it's pretty, and I will still keep wishing and hoping!  Because that is what is important. 

Tuesday, September 18, 2012

Painting with Grandparents - Grandma Moses and Grandparents Day! September 7 & 9

1 Hour

Intended for 25 guests, grades K-5 with grandparent(s)

Supplies

"The Dot" by Peter H. Reynolds
25 water color sets
25 paint brushes
75 pieces of watercolor paper or card stock
Lovely classical music
Printings (from a color printer) or Grandma Moses's art

Program

As a Children's Librarian, we often become aware of obscure holidays and then find ways to celebrate them in programs.

September 9th is Grandparents Day. 

September 7th is Grandma Moses Day.  It was designated so because September 7th is the birthday of Anna Mary Robertson Moses.  She started a successful American folk painting career late in her life (when she was already a Grandma) which is why she was affectionately named Grandma Moses.  She commonly painted scenes from America's rural past.  Her paintings were used to publicize numerous American holidays.  During the 1950s, her exhibitions were so popular they broke attendance records!

Why not combine these two holidays, since they are so close in date and have a Painting with Grandparents program to celebrate them!

Grandma Moses, Halloween, 1955


I printed out some of Grandma Moses's art work and hung it in the program room to create a galleria.  Very simple yet totally refined. ;)

On one half of the room, there was a story corner set up, and on the other half, tables and chairs with water colors and paints.  

At the beginning of the program, I read a brief description of who Grandma Moses was and why it is celebrated on September 7th and also explained that Grandparents day is only 2 days after.

I then read a book to inspire the creativity of the group and warm their hearts.  Peter H. Reynold's "The Dot" is just a lovely story that teaches everyone they can be an artist.

After a reading of the story, I put on the classical music (a lovely mix of Bach, Beethoven, and Brahms) and told everyone to go out to the tables and paint and be free!  The results were amazing.  Beautiful works of art from the children and the grandparents alike.  All in all, it was just a lovely, and very simple program to do.


These are two paintings that were made for me by two little guys who love the Titanic!  Truly made my day! 


Tuesday, August 21, 2012

International Sing Out Day! September 15

1 hour

Intended for 25 guests, grades 5-7

Supplies

Karaoke Machine OR
Gaming system that has karaoke games
Karaoke CDs OR
Karaoke games
Pizza (optional: for those hungry tweens!)
Plates
Napkins
Drinks

Program

This is pretty simple, and you probably get whats going on just by reading the supplies list.  Karaoke for tweens!  Some people just love to sing.  (I did and still do!)  Karaoke is a good time whether you can or can't sing, just watch others who do or just want to hang out with a fun crowd!  Why not host a karaoke event in a safe environment.  Monitor to make sure they are taking turns or have a sign up sheet and they can put in their song requests.  Just have fun with this one and they have fun too! 

The following gaming systems have karaoke games and microphone pieces to go with them:  PlayStation2, PlayStation3, Wii, XBOX360

At our library we have:

For the PlayStation2 and 3: 
Karaoke Revolution 
Karaoke Revolution Country
American Idol Encore

For the Wii:
Disney Sing It
Disney Sing It: Party Hits
Disney Sing It: High School Musical
Disney Sing It: High School Musical 3 - Senior Year
Disney Sing It: Pop Hits
Boogie
Hannah Montana: Spotlight World Tour

For XBOX360:
Karaoke Revolution: American Idol Encore


Dictionary Day! October 16

Drop-in Program, All day

Intended for all the guests of the Children's Department

Supplies

Paper
Pencils

Program

Dictionary Day is October 16!  I wanted a fun and creative way to celebrate the language that we use, for better or for worse.  This is a very simple drop-in program that can take place all day long.  Participants can ask the reference librarian for a pencil and a piece of paper, and then feel free to create their own word, including a new definition too.  The created words can then be displayed on a bulletin board through out the day or till the end of the week.  Participants will feel pride in having their own new and innovative word on display for all to see! 

If you want to get a little fancy, because it is too simple for you, you could create a template for the participants to use when creating their new word:


confergate (kuhn-fur-geyt) verb. to go through a passageway by use of a secret or magic word of phrase. 

That's pretty much all she wrote.  Pun intended. 

Wednesday, August 15, 2012

Life Size Treasure Hunt!

45 minutes

Intended for 24 guests, grades 2-6

Supplies

An assortment of 35 or so random objects (ie. floppy disk, plastic banana, nerf darts, toy car, marbles, dice, clothes pins, toy figures, hilighter, peppermint candies, legos, a golden egg...)
A digital camera
Blocks (to create a background setting for the photo)
Smartboard
Laptop
Interactive "hidden objects" game

Program

For this program, the idea was to not only participate in a life size treasure hunt, but also to create your own to take with you!

In my library, we have a smart board.  And these things are actually pretty cool and very interactive.  We have been encouraged to use the smart boards in programs, so I was trying to think of a way that I could use it in a program and also have the kids use it.  I instantly thought of those "hidden objects" games!  I may or may not have an addiction to the hidden object games...
I used my MacBook for the program (because that's what I am familiar with) and from the Apple App store and I purchased Mysteryville: Hidden Object Investigation to use for the program.  It is like an "I Spy" book, but it's interactive.  There is a story line that goes with the objects you have to find, there is a certain amount of time to find the hidden objects, once you find the object you have to click on it and if you click too many random things you get a time penalty.  It's a lot of fun.  I wanted to project this game onto the smart board, and have the kids be able to play it on a huge screen and touch the items to collect them.  It was simple enough to implement, yet fancy and techie enough to draw a crowd and keep them interested. 

The second part of the program  was creating your own hidden objects game. I brought in 35 different totally random objects from home and I borrowed some from the library play space too.  Our library also has big foam building blocks.  I had the children build a setting with the foam blocks to use as a background for the "I Spy" picture.  I placed all the random items on a table in the room.  I had the children stand pick a random item that they wanted place in the scene.  Once the scene was set, I then used the digital camera to take a picture of the scene.  I wrote up a list of all the items that were hidden in the picture so that later on they can play and share with others the game they created. 


Here are the photos from two different angles!  See how many hidden objects you can find!  
  

Friday, August 3, 2012

International Paper Airplane Day! August 17

45 minutes

Intended for 25 guests, grades 2-4

Supplies

Pilot Wings pins
Paper (about 150 sheets)
Pencils
Hula hoops
Painters tape
String
"Origami Paper Airplanes" by Dider Boursin
"Paper Airplanes: Flight School" by Christopher L. Harbo
"Paper Airplanes: Copilot" by Christopher L. Harbo
"Paper Airplanes: Pilot" by Christopher L. Harbo
"Paper Airplanes: Captain" by Christopher L. Harbo
"The Kid's Guide to Paper Airplanes" by Christopher L. Harbo

Program

This program is about making paper airplanes, obviously, but it is also about that age old lesson: "If at first you don't succeed, try, try again!"  It is a learning experience, as is much of life. 

When I was planning this program in my mind, where everything goes wonderfully according to how I envision it, I thought I would be able to have one of the major airlines graciously donate (because it's for the children!) the pilot wing pins that they hand out to children who fly with their airline.  This was a very lovely thought indeed.  However, when I started to do the footwork, and I called or emailed several of the major airlines (I will not drop names), I was given what is commonly known as "the runaround" and I received no complementary pins from anyone.  Sad face.  Thankfully though, Oriental Trading had these little pins ($3 for one dozen):


And my vision was fulfilled!

As the children walk into the program, you can hand them their unofficially official pilot wing pins as you tell them that today, they will become champions of the art form known as paper airplanes. 

I set up half of the room with tables for constructing planes.  On the tables, I laid out the various books listed above so that they can get some ideas.  I also had pencils on the table so they could write their names on the plane and create a plane name.  The other half of the room was set up with tests and obstacles to which they could submit their newly fashioned paper airplanes.


I put painters tape on the floor for a starting line, and had the children stand on the line and give their airplane a toss to see whose went farther. 

I hung hula hoops from the ceiling and they tried to fly their planes through the rings. 


I had baskets on the floor, and they tried to get their plane to land in the bucket.  Because, if you've flown on a plane before, you know that the landing is just as important as the flight. 

If their first plan does not preform in the test arena as they wished, they can "try, try again" and make a new one!

Thursday, July 5, 2012

Department Wide Mystery!

1 Week

Intended for all the guests of the Children's Department 

Supplies

Paper
Assorted clues to leave behind at the scene of the crime

Program

One of the books that I use to get ideas from, The Storytime Sourcebook II, has a section titles "Topical Events Calendar for Tie-in Storytime Themes."  Looking through this, I learned that the first week in October is Mystery Series Week.  So I decided to create a mystery for the whole department to solve during this week.  

On the first day, I released the back story: 

WHO STOLE THE COOKIES FROM THE COOKIE JAR:
A CLASSIC WHODUNIT

THE FACTS:
Mrs. Fusco is a wonderful baker.  Often, she bakes cookies for the librarians, the clerks and the pages in the Children’s Department.  The Children’s Department decided to have a little party to celebrate the library and all the good work we do!  Mrs. Fusco brought her tasty peanut-butter cookies in a fancy cookie jar and put them on the top shelf.  But when everyone went to enjoy the cookies, the jar was empty!!!

And the suspects:

(I took clip art images of different people from Google and created a profile for each one.)


Each day following, I released a one new clue and a new development: 
(I had the physical clues in the library for our mystery solvers to check out!)

CLUE 1: 
There was a pair of sunglasses left at the scene of the crime…
         
  
NEW DEVELOPMENTS:
The sunglasses were women’s sunglasses.
CLUE 2:  
There was handwritten note left at the scene of the crime…


NEW DEVELOPMENTS:
A handwriting analysis proved that it was written by someone left handed. 
CLUE 3:  
There was what looks like tire marks left around the scene of the crime…
         

NEW DEVELOPMENTS:
The tire marks were tested at the lab and was determined they were created by a toy truck. 
CLUE 4:  There was some fur found at the scene of the crime…


NEW DEVELOPMENTS:
The fur was from a cat. 
CLUE 5: 
All of the fake flowers at the celebration were replaced with real ones…

         
NEW DEVELOPMENTS:
One of the librarians brought fresh flowers to the party.   
CLUE 6: 
There was a strong smell of aftershave at the scene of the crime…


All throughout the week, and especially at the end of the week, the guests were encouraged to make their guess as to which suspect stole the cookies from the cookie jar!  Can you guess who it was?  

Digital Detectives

1 hour

Intended for 20 guests, grades 4-7

Digital detectives is a scavenger hunt that takes place in the library and incorporates technology.  Sounds awesome, right?  Well, it is.  Guests are given clues, and from there, they need to find the location of their next clue.  Some times, guests are asked to take a picture at a location, or use a QR reader to read a QR code to find their next clue.  Be creative with this!  

Supplies

Paper to write clues on
Prizes for the winning team (if you so choose)

Program


The set up and prep for this program is the most intense part.  After that, it kind of just flows on it's own.  Put on your thinking cap, and get ready to think up some clues for your detectives.  You can see below, that I tried to go more general, and featured a lot of different sections in the library.  This way, while they are scavenging, they are also giving themselves a grand tour.  

I created one set of 14 clues.  I printed out four sets of these 14 clues, each set having its own brightly colored paper.  Each color will be a different team.  (I had 4 teams with 5 members each.)  I numbered each set of clues with a different order.  I went around the library and hid the clues in their respective hiding places.  The brightly colored paper make it some what easy to find once hidden.  

At the start of the program, explain that each team is a different color, and that you are only to take your color clue.  If you take the wrong color, you will miss out on clues and lose.  If needed, also explain how to use the QR reader (I use NeoReader -- very easy and fast!) and take photos with the device.  We use iPads for this program. You can give them one chance to "Ask A Librarian" for help finding a clue, or more if you would like, but the point is to get them to use their detective skills!  Hand each team an iPad and the first clue in their uniquely ordered set. (This way there is not a huge mob all running to one location.)  Once they have their first clue, it is on them to find the next, and so on after.    

The first team to bring back all 14 clues, and take the needed photos wins!  

Below are the clues that I created and used for my Digital Detectives hunt:

If you’re really hungry, you might find some food to make in this book.   [HINT: Remember to include the word “juvenile” in your search]
When you first started reading, you probably checked out some EASY READERS.  Head on over there and find your clue!
Find the GRAPHIC NOVEL section and snap a photo of your favorite hero.  Find your next clue in this area!
If you want to look something up in the library catalogue, this computer might help you.  [HINT: CHECK BEHIND THE SCREEN]
If you don’t want to read a book, you can always listen to a book using one of these…
Tired of the same old books?  Why don’t you try a NEW BOOK
Something to get the beat bumping?  NOW THAT’S WHAT I CALL MUSIC! 
Coming after the DVD, these “blue” discs boast HD movie viewing capabilities. 
Snap a photo of your team playing with some fun toys.  [HINT: CHECK THE PLAYSPACE]  Find your next clue in this area!
Find a book about the state we are in right now! 
Check out the video gaming section and snap a photo of a teammate pretending to play.  Find your next clue in this area!
The first QR code shows a picture of the Harry Potter series. 

The second shows a penguin.

The last shows a picture of Mickey Mouse.  

Happy hiding and hunting!  


Wednesday, June 27, 2012

Story Cubes

45 minutes

Intended for 25 guests, grades 4-7, grades 8-10

Supplies

Rory's Story Cubes
Rory's Story Cubes: Actions
Paper
Pencils


Program

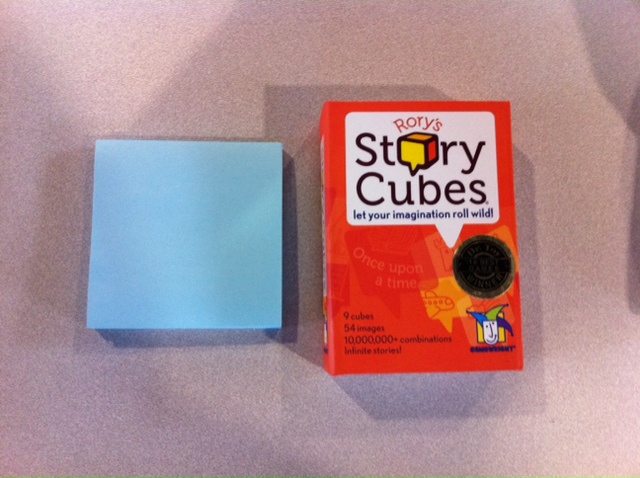
Rory, who ever and where ever you may be, the invention of the Story Cubes is great!  In this small box, (picture taken next to a stack of post-it notes for size reference) you get 9 cubes.  Each cube face had a different image which means that there are over 10 million combinations that can be created with the roll of the cubes!  


There are a couple of different suggestions for how to play in the box, but the basic premise is, you roll the cubes, and based on what images you get, you create a story. 

For this program, the guests can either work in pairs, teams, or solo!  Roll out the cubes, and start creating.  give them enough time to get creative and funky.  Have them write down their story line, and then at the end of the program, share their imaginative tale with the rest of the group.  It's simple.  It's a blast.  It's creative.  It's literacy.  Rory, you are my hero! 


Here is an example of a little story I came up with...

Once upon a time... on a stormy summer afternoon, a little girl named Lil sat in her room at her house, bored.   She couldn't go outside, because it was storming, she had just finished the stack of books she borrowed from the library, and her sister was at a sleep-away Lacrosse camp.  She was bored!   She wished that something exciting would happen, a fun adventure... 

Just then, Lil heard a bumble bee buzzing very loudly outside of her bedroom door.  The buzzing sounded like a very familiar song.  She opened the door, followed the buzzing bee until she came upon a package, with her name on it.  Very curious!  Inside the package was a die, and a little note that said "Roll the die, if you dare!  Adventures await, so beware!"  Lil didn't even hesitate!  She rolled the die. 

Just then, there was a tap on her bedroom window.  She turned around to see who was there, but saw no one.  Only another package!  She opened the window quickly so the package didn't get too wet.  Inside the package was a flashlight and another note that read "Inside your closet you will find, a curious creature's been confined".  This puzzled Lil, because she had been in her closer many times, and never seen a 'curious creature'.  She turned on the flashlight, and walked into her closet.  Suddenly, Lil realized she had been walking in her closet for quite some time now, and hadn't reached the back. 

She walked a bit more until she saw two yellow eyes looking back at her.  Lil could have run away, but she was brave!  She walked towards the yellow eyes, towards the curious creature, and with each step, her heart went "thump, thump thump". 

As she got closer though, she realized that the curious creature was crying, big heaving sobs.  She walked over and asked "Why are you crying sir?"  The curious creature said "I'm cold and sad and hungry too, I wish I had some warm fish stew".  Now, Lil, being a very kind girl said to the curious creature, I will help you. 

Being a girl scout, Lil knew how to get a nice safe fire started, so she built one for him.  She walked a bit further into her closet and found a fountain.  In the fountain, there were some fish.  Lil was able to catch one, and the cooked up a nice fish stew for the creature over the fire she made.  The creature was so grateful.  He felt much better, and he and Lil were both glad they had made a new friend.  What an adventure the day turned out to be! 

Thursday, May 10, 2012

Spytastic Secret Codes

45 minutes

Intended for 25 guests, grades 4-6

Supplies

"Making Secret Codes" by Jillian Gregory
25 pencils with erasers
25 pens
25 big pie charts printed on card stock*
25 small pie charts printed on card stock*
25 brass fasteners
25 foam sheet circles
25 Spytastic Secret Codes worksheets**


Program

This program was completely developed by me through the use of the book "Making Secret Codes" by Jillian Gregory.

Read aloud pages 6-7 in the book which introduce codes in general.  Why they came about, how they are used...

Then, read aloud pages 10-11 about creating a Ceasar Shift Code.  On the Worksheet, have them create their own Ceaser Shift Code using the number 10.  This means that the second alphabet would begin under the letter K. 


A
B
C
D
E
F
G
H
I
J
K
L
M
q
r
s
t
u
v
w
x
y
z
a
b
c
N
O
P
Q
R
S
T
U
V
W
X
Y
Z
d
e
f
g
h
i
j
k
l
m
n
o
p

Then have them decode this message. 

Dro wkx gry nyoc xyd bokn lyyuc rkc xy knfkxdkqo yfob dro wkx drkd mkxxyd bokn drow. – Wkbu Dgksx

(The man who does not read books has no advantage over the man that cannot read them. – Mark Twain)

The children can then make their own secret message using the Ceaser Shift Code. 

Then read aloud pages 26-27 about the Alberti Disk and have the children create their own. 

*To make the pie chart for the Alberti Disk:
1. Open Microsoft word
2. Click into the INSERT tab
3. Click on CHART
4. Scroll down to PIE CHART and select the "Pie" chart (not the "Pie in 3D" or "Pie in Pie")
5. When the excel sheet opens so that you can adjust  the values, drag the corner down to expand the total amount of "slices" to 26.  (One for every letter in the alphabet)
6. Make each "slice" the same value so that each slice will be the same size (assign a value of one to each cell in the excel sheet)
7.  Close the excel sheet and the pie chart will appear in the word window.
8.  Repeat steps 1-7 a second time.
9.  Make one of the pie charts bigger by right clicking on the image in word and expanding corner. 
10.  Print out 25 copies of each and cut out the circles. 

Each child should be given a small pie chart and a large pie chart.  Tell the children to write the alphabet around both disks, putting one letter in each slice.  Then fasten the two disks and the foam circle together by putting the brass fastener through the center of each circle.  As you spin the disk around, have the slices match up, with a different letter.  Have the children practice writing words in code using the disk as a codex. 


Spytastic Secret Codes Worksheet**